Security & Data Protection
We never store card details. All transactions are processed in real time through the bank’s secure payment gateway using industry-standard encryption.
Introduction
API Reference
API Endpoints & Authentication
All requests to the Dispute Response API are sent via the HTTP POST method to one of our API endpoint URLs.
HTTP Request Method: POST
Production API Endpoint For CC:
https://crm.dispute-response.com/RestApi/doTransaction
All calls to the Dispute Response API require merchant authentication.
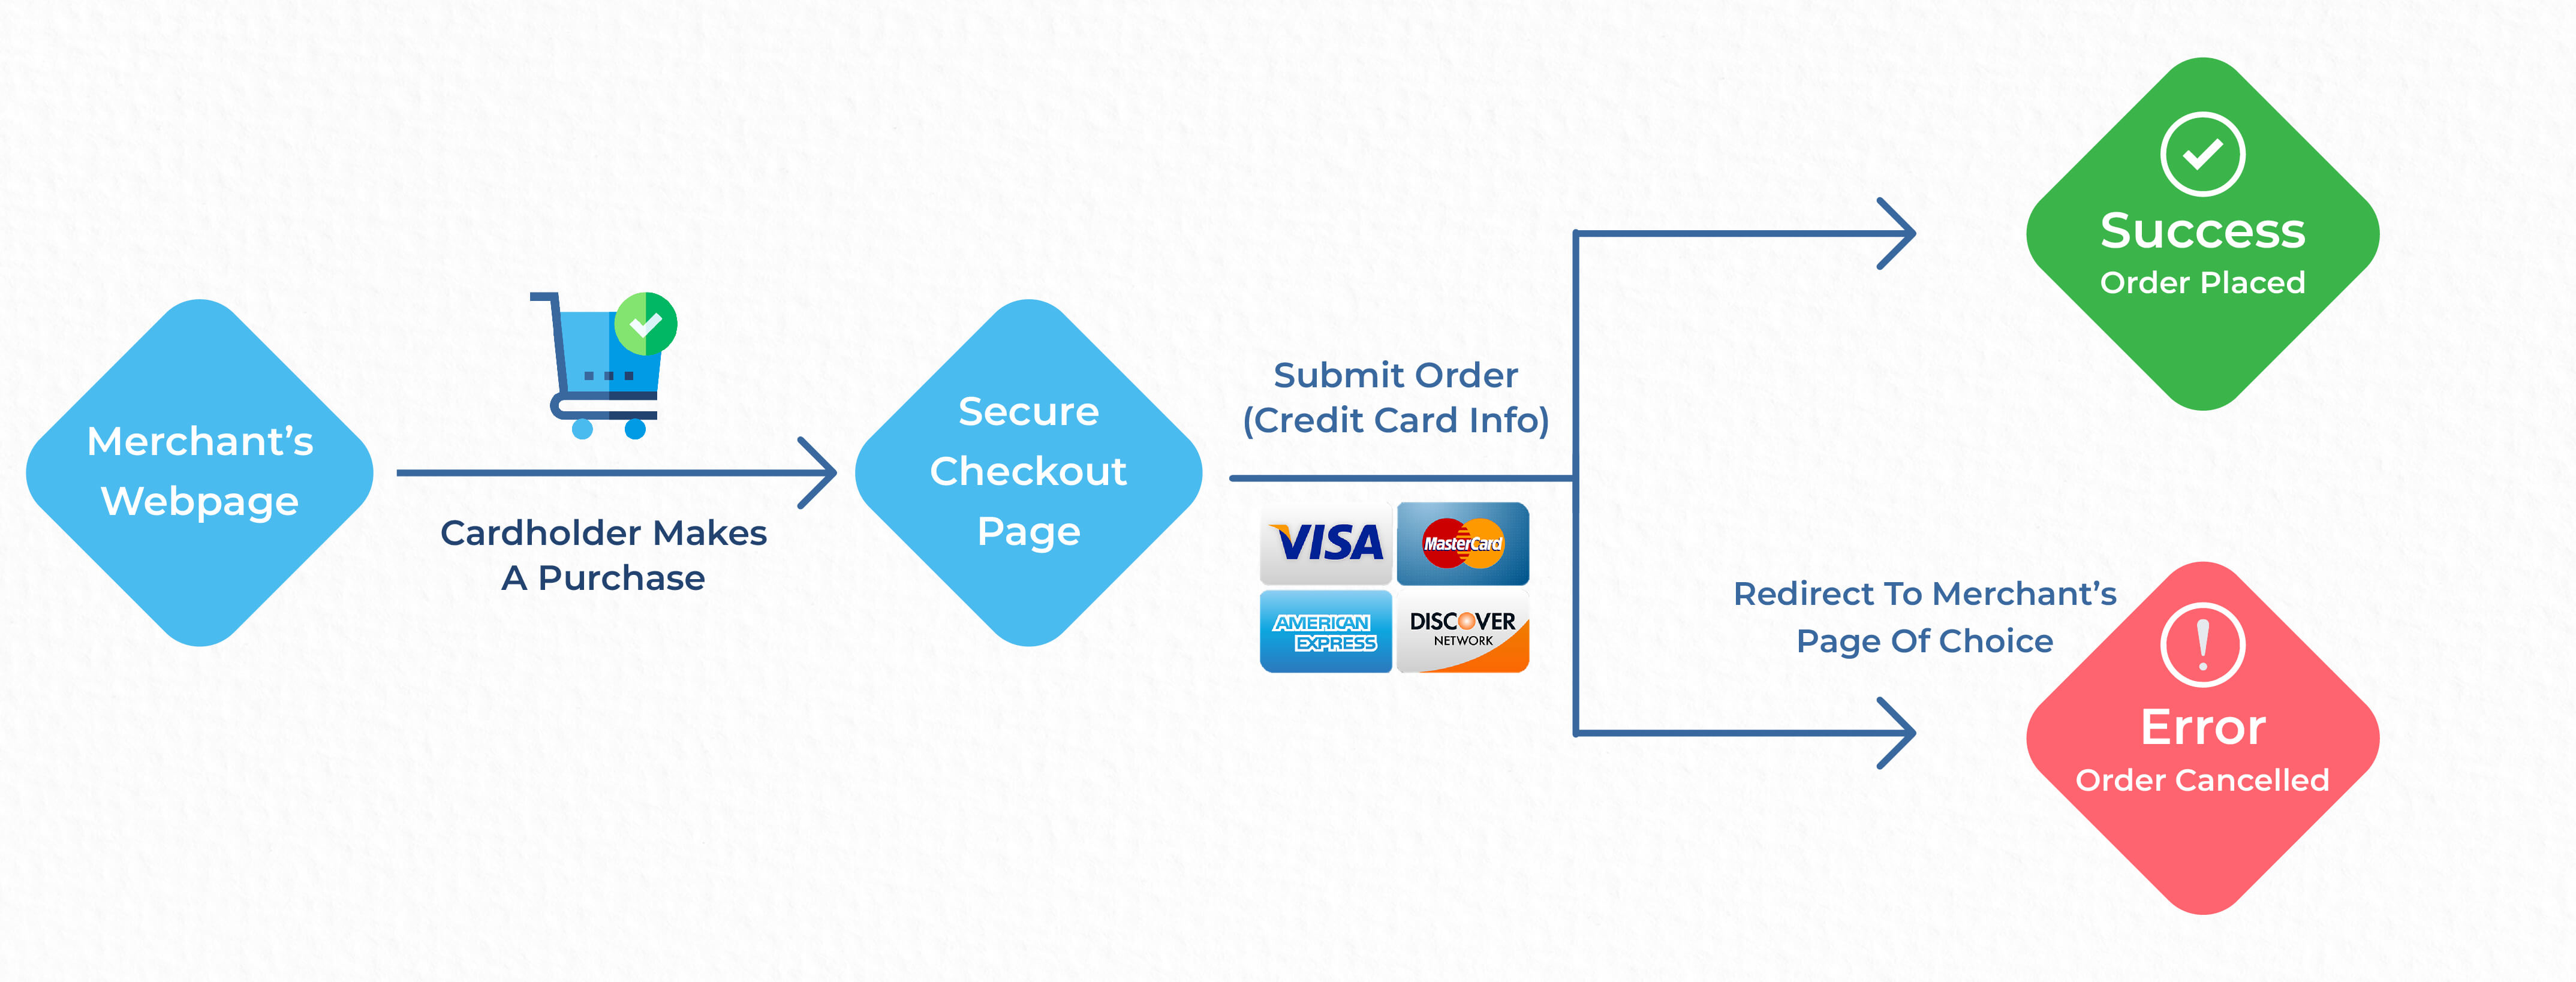
API-Based Checkout
Using server-to-server (cURL) integration, this checkout method enables secure credit card processing within a new or existing e-commerce website without redirecting customers to an external payment page.
Features
API-Based Checkout is designed for merchants who sell products online. Its simple server-to-server integration allows even semi-technical teams to quickly add purchase links or payment buttons to their products without complex development.
API-Based Checkout is Perfect for Merchants Who:
- Want a fully integrated checkout experience without redirecting customers away from their website
- Use API/cURL-based server-to-server integration for secure payment processing
- Require complete control over the checkout flow and user experience
- Need advanced flexibility for custom payment logic and workflows
Transaction Flow
Get MID List
Before executing any transaction with Dispute Response, you must first
retrieve the MID (Merchant ID) list from the server.
Transactions
will not be processed unless a valid MID is provided.
Note: A valid API Key is required for all requests.
Production API Endpoint For MID:
https://crm.dispute-response.com/RestApi/mid_list
| Field Name | Type | Required | Example | Description |
|---|---|---|---|---|
| apikey * | string | Yes | ABXC5405046SAD | Your API authentication key |
curl --location 'https://crm.dispute-response.com/RestApi/mid_list' \

--header 'Cookie: ci_session=2f47188816a406b7aeff0ee97f60925656a894dd' \

--form 'apikey=ABXC5405046SAD'
{
  "status": "Success",
  "response_code": 200,
  "message": [
    {
      "mid_id": "164",
      "mid_number": "5847392619084472",
      "mid_alias": "BPS Atlas Test"
    }
  ]
}
Get Country List
Before executing any transaction with Dispute Response, you must retrieve the Country List from the server.
Production API Endpoint
https://crm.dispute-response.com/RestApi/country
curl --location --request POST \

'https://crm.dispute-response.com/RestApi/country'
{
  "status": "Success",
  "response_code": 200,
  "message": [
    {
      "id": "4",
      "code_char_2": "AS",
      "code_char_3": "ASM",
      "name": "American Samoa",
      "phonecode": "1684"
    },

    {
      "id": "231",
      "code_char_2": "US",
      "code_char_3": "USA",
      "name": "United States",
      "phonecode": "1"
    }
  ]
}
Get State List
Before executing any transaction with Dispute Response, you must retrieve
the State List from the server.
Transactions will not be
processed unless a valid state is provided.
Note: A valid Country ID is required for this request.
Production API Endpoint
https://crm.dispute-response.com/RestApi/state
| Field Name | Type | Required | Example | Description |
|---|---|---|---|---|
| country_id * | string | Yes | 201 | Unique identifier of the selected country |
curl --location 'https://crm.dispute-response.com/RestApi/state' \

--header 'Cookie: ci_session=aa127a31522523f6b54cfd66c1b81e884e35f105' \

--form 'country_id=123'
{
  "status": "Success",
  "response_code": 200,
  "message": [
    {
      "id": "18655",
      "country_id": "231",
      "short_name": "AL",
      "state_subdivision_name": "Alabama",
      "country_code_char2": "US",
      "country_code_char3": "USA"
    },

    {
      "id": "18673",
      "country_id": "231",
      "short_name": "WY",
      "state_subdivision_name": "Wyoming",
      "country_code_char2": "US",
      "country_code_char3": "USA"
    }
  ]
}
API-Based Checkout Examples
The demos on this page are slightly enhanced beyond what's outlined in their respective Detail & Code areas. Mainly, the code examples are a great foundation to build and customize upon.
The JavaScript in this example is used to:
In this example, the files getcountry.php, getstate.php, getproduct.php, and api.php are included. All this information is coming via our API. Please mention your API credentials in this variable.
$api = 'YOUR API KEY HERE';
The mid_id parameter should be obtained from the MID List API.
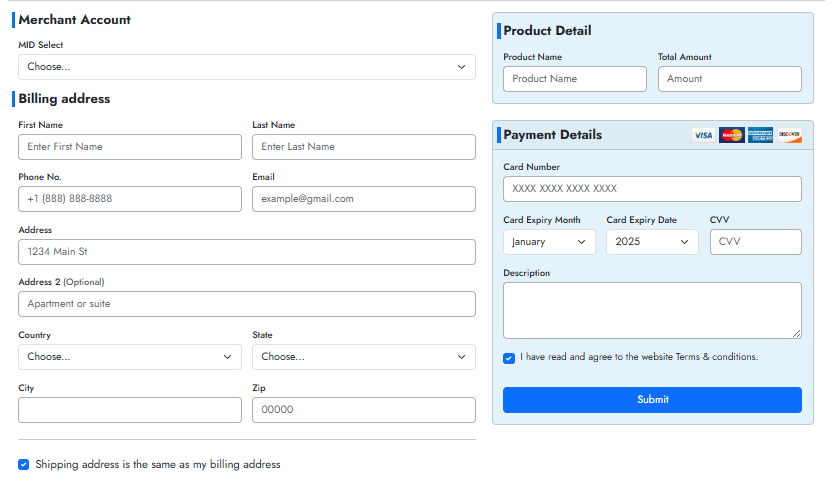
Prospects create and submit transactional information the to Dispute Response System.
| Name | Example | type | Description |
|---|---|---|---|
| api_key * | ABXC5405046SAD | String | API KEY |
| mid_id * | 164 | int | Internal MID Id |
| product_name * | Wireless Bluetooth Headphones | String | Product Name |
| total_amount * | 29.95 | int | Total Amount |
| bill_fname * | Nicholas | String | First Name of Customer |
| bill_lname * | Townsend | String | Last Name of Customer |
| bill_email * | nicholasjtownsend@dayrep.com | String | Valid Email Address (Email Receipt and Order Confirmation is sent for this Email) |
| bill_mobile * | +1(504)552-4556 | char | Valid Phone |
| bill_add_1 * | 1184 Lodgeville Road | String | Address |
| bill_add_2 | Conaway Street | String | Address |
| bill_country * | US | Char | Country (ISO-3166-2) |
| bill_state * | MN | Char | State (ISO-3166-2) |
| bill_city * | Richfield | String | City |
| bill_zip * | 55423 | int | Valid Zipcode |
| is_ship_change * | 1 (1 OR 0) | int | If shipping address is same as billing, use 1, otherwise 0 |
| card_number * | 4242424242424242 | int | Credit card number |
| exp_month * | 08 | int | Credit card expiration |
| exp_year * | 2029 | int | Credit card expiration Year |
| cvv * | 123 | int | Card security code |
| ip_address * | 12.15.15.10 | int | Current IP Address to Charge Customer |
| ship_fname | Nicholas | String | First Name of Customer |
| ship_lname | Townsend | String | Last Name of Customer |
| ship_mobile | +1(504)552-4556 | char | Valid Phone |
| ship_email | nicholasjtownsend@dayrep.com | String | Valid Email Address (Email Receipt and Order Confirmation is sent for this Email) |
| ship_add_1 | 1184 Lodgeville Road | String | Address |
| ship_add_2 | Conaway Street | String | Address |
| ship_country | US | Char | Country (ISO-3166-2) |
| ship_state | MN | Char | State (ISO-3166-2) |
| ship_city | Richfield | String | City |
| ship_zip | 55423 | int | Valid Zipcode |
| is_recurring | 1 | int | Example: 0 = Not recurring, 1 = Recurring |
| recurring_days | 30 | String | If you want to add recurring please pass Recurring days |
| desp | High-fidelity over-ear headphones with 20 hours battery life | String | description |
    $postdata = array(

    'api_key' => 'ABXC5405046SAD',

    'mid_id' => '164',

    'product_name' => 'Wireless Bluetooth Headphones',

    'total_amount' => '29.95',

    'bill_fname' => 'Nicholas',

    'bill_lname' => 'Townsend',

    'bill_email' => 'nicholasjtownsend@dayrep.com',

    'bill_mobile' => '+1(504)552-4556',

    'bill_add_1' => '1184 Lodgeville Road',

    'bill_add_2' => 'Conaway Street',

    'bill_country' => 'US',

    'bill_state' => 'MN',

    'bill_city' => 'Richfield',

    'bill_zip' => '55423',

    'is_ship_change' => '1',

    'card_number' => '4242424242424242',

    'exp_month' => '08',

    'exp_year' => '2029',

    'cvv' => '123',

    'ip_address' => '12.15.15.10'

    'ship_fname' => 'Nicholas',

    'ship_lname' => 'Townsend',

    'ship_mobile' => '+1(504)552-4556',

    'ship_email' => 'nicholasjtownsend@dayrep.com',

    'ship_add_1' => '1184 Lodgeville Road',

    'ship_add_2' => 'Conaway Street',

    'ship_country' => 'US',

    'ship_state' => 'MN',

    'ship_city' => 'Richfield',

    'ship_zip' => '55423',

    'desp' => 'High-fidelity over-ear headphones with 20 hours battery life',


);
{
  "status": "success",
  "response_code": 200,
  "message": "Your Transaction has been done Successfully",
  "transactionid": "11609989082",
  "order_id": "AnlRSINQQD",
  "authcode": "123456"
}
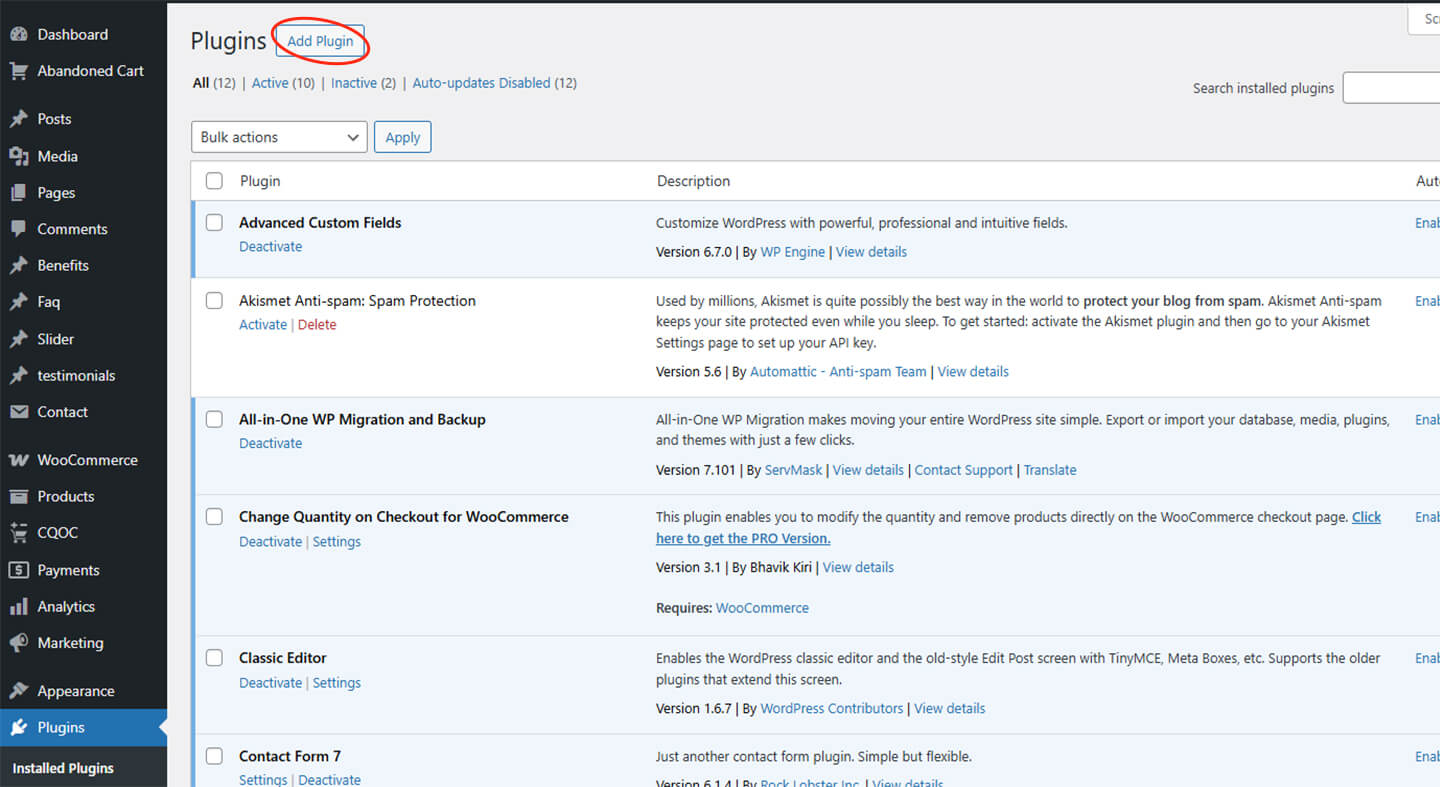
Woo Plugin Installation
Go to WordPress Admin > Plugins > Add New.
- Log in to your WordPress admin panel (usually at www.yoursite.com/wp-admin).
- Navigate to the left sidebar and click on the Plugins menu.
- Select Add New from the dropdown menu. The plugin installation page will appear.
- You can search for a specific plugin or browse through the available ones.
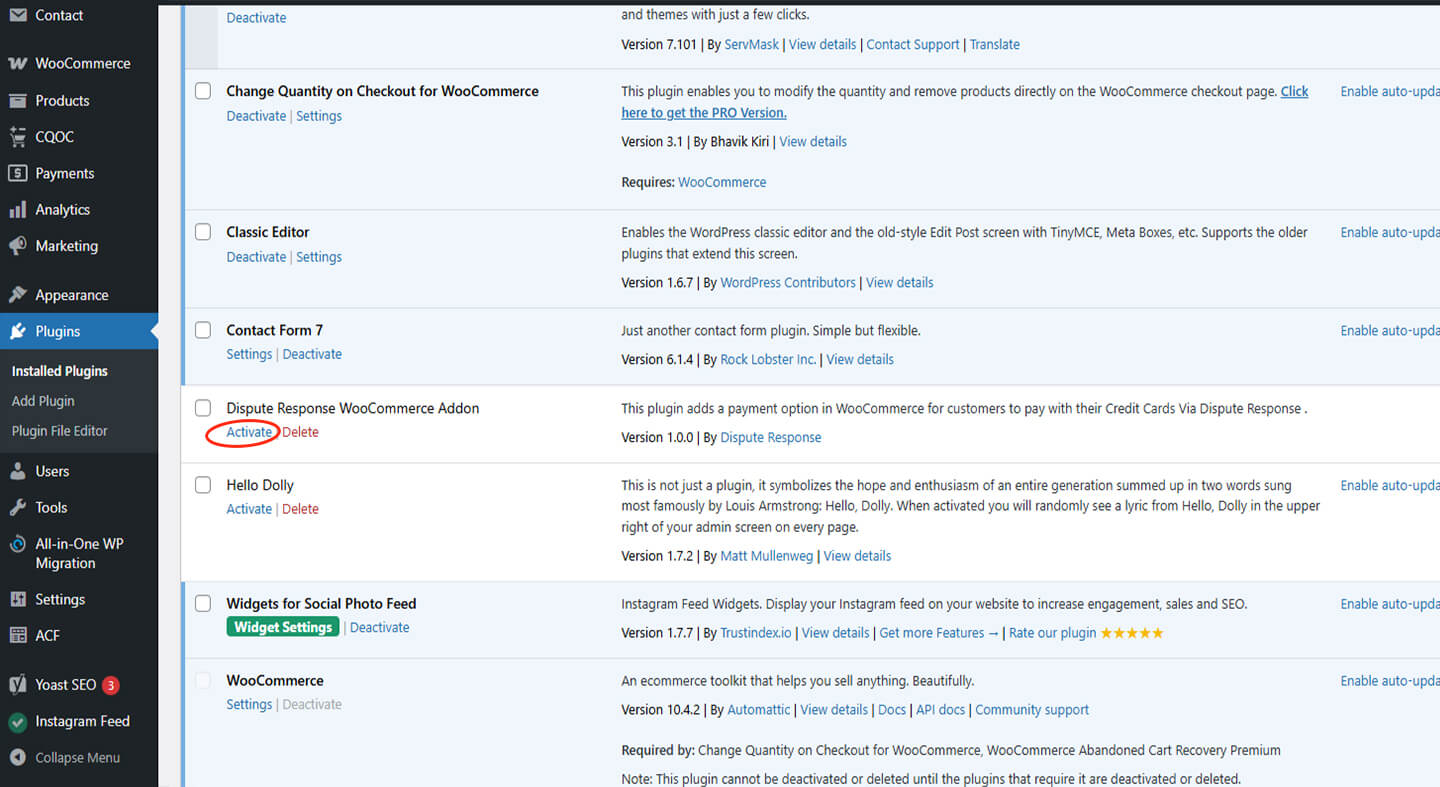
Activate the Plugin
- If the plugin is listed, click the Install Now button next to the plugin name.
- Once installed, the button will change to Activate. Click Activate to enable the plugin on your site.
- If uploading a plugin manually, click the Upload Plugin button, choose the .zip file, and click Install Now, then Activate.

Upload Plugin File (If Applicable)
- On the Add Plugins page, click on Upload Plugin.
- Click Choose File, select the .zip file for the plugin, and click Install Now.
- Click Activate Plugin after installation to enable it on your WordPress site.
Configure Plugin Settings with API Credentials
- After activation, most plugins will add a new menu item to your WordPress dashboard.
- Find the plugin's settings page, which is typically under the Settings menu or as a separate section labeled with the plugin name.
- Look for fields like API Key, API Secret, or Merchant ID to input your credentials from the external service you're connecting to.
- Enter the credentials and any additional configuration settings required by the plugin (currency, payment options, etc.).
- Click Save Changes.
Bank Decline Code
| Response Code | Reason | Description |
|---|---|---|
| 100 | Transaction was Approved | Transaction was Approved |
| 200 | Transaction was Declined by Processor | The customer's bank is unwilling to accept the transaction. The reasons for this response can vary – the customer will need to contact their bank for more details. |
| 201 | Do not Honor | The customer's bank is unwilling to accept the transaction. The customer will need to contact their bank for more details regarding this decline. |
| 202 | Insufficient funds. | The account did not have sufficient funds to cover the transaction amount at the time of the transaction. |
| 203 | Over limit. | The attempted transaction exceeds the withdrawal limit of the account. The customer will need to contact their bank to change the account limits or use a different payment method. |
| 204 | Transaction not allowed. | The customer's bank is declining the transaction for unspecified reasons, possibly due to an issue with the card itself. They will need to contact their bank or use a different payment method. |
| 220 | Incorrect payment information. | Incorrect payment information. |
| 221 | No such card issuer. | This decline code could indicate that the submitted card number does not correlate to an existing card-issuing bank or that there is a connectivity error with the issuer. The customer will need to contact their bank for more information. |
| 222 | No card number on file with issuer. | The submitted card number is not on file with the card-issuing bank. The customer will need to contact their bank. |
| 223 | Expired card. | The card is expired. The customer will need to use a different payment method. |
| 224 | Invalid expiration date. | The customer entered an invalid payment method or made a typo in their card expiration date. Have the customer correct their payment information and attempt the transaction again – if the decline persists, they will need to contact their bank. |
| 225 | Invalid card security code. | The customer entered in an invalid security code or made a typo in their card information. Have the customer attempt the transaction again – if the decline persists, the customer will need to contact their bank. |
| 226 | Invalid PIN. | Can mean Invalid PIN or missing PIN. Some cards can be set to always require a PIN. |
| 240 | Call issuer for further information. | Call issuer for further information. |
| 250 | Pick up card. | The customer’s card has been reported as lost or stolen by the cardholder and the card-issuing bank has requested that merchants keep the card and call the number on the back to report it. As an online merchant, you don’t have the physical card and can't complete this request – obtain a different payment method from the customer. |
| 251 | Lost card. | The card used has likely been reported as lost. The customer will need to contact their bank for more information. |
| 252 | Stolen card. | The card used has likely been reported as stolen. The customer will need to contact their bank for more information. |
| 253 | Fraudulent card. | The customer’s bank suspects fraud – they will need to contact their bank for more information. |
| 260 | Declined with further instructions available. (See response text) | Declined with further instructions available. |
| 261 | Declined-Stop all recurring payments. | Declined-Stop all recurring payments. |
| 262 | Declined-Stop this recurring program. | Declined-Stop this recurring program. |
| 263 | Declined-Update cardholder data available. | The submitted card has expired or been reported lost and a new card has been issued. Reach out to your customer to obtain updated card information. |
| 264 | Declined-Retry in a few days. | Declined-Retry in a few days. |
| 300 | Duplicate transaction | transaction was rejected by gateway. |
| 400 | Transaction Error Returned by Processor | |
| 410 | Invalid Merchant Configuration | |
| 420 | Communication Error | |
| 440 | Processor Format Error | |
| 441 | Invalid Transaction Information | |
| 460 | Processor Feature not Available | |
| 461 | Unsupported Card Type |
Gateway Decline Reason
| Reason | Frontend Notes | Internal Notes |
| Merchant account is disabled | Your account is disabled. Please contact customer support. | F01 This account is currently inactive. Please contact your administrator for assistance. |
| If CC not allowed to merchant | API transaction is disabled for your account, please contact customer support. | F02 API transactions are disabled for your account. Please reach out to the administrator. |
| If merchant product type is not open and product code not available | This product not supported.please contact customer support. | F03 The selected product is not available.Please reach out to the administrator. |
| All IP block for particular country | Unfortunately, services are not available in your region at this time. | F04 Restricted IP for the Country! Not Authorized to process an order |
| Block particular IP | You are permanently blocked, please contact customer support for more information. | F05 Restricted IP! Not Authorized to process an order |
| Check Incoming IP Address is valid or not | You are permanently block, please contact customer support for more information. | F06 Restricted IP! Not Authorized to process an order |
| If transaction failed (n) times with perticular ip address | You are temporarily block, please contact customer support for more information. | F07 Due to repeated failed transaction attempts, Transaction has been blocked. Please contact administrator. |
| If transaction failed within 1 min then blocked for 10 min | You are temporarily blocked. Please try again after 10 minutes. | F08 Multiple failed attempts transaction has been temporarily blocked. Please try again after 10 minutes or contact administrator. |
| Particular card number | You are permanently blocked, please contact customer support for more information. | F09 The transaction is blocked due to the Restricted Card Number |
| Particular BIN number | This particular card /bin is Blocked. Please try a different card. | F10 The card you used is from a blocked BIN. Please use a different card. |
| Particular email address (proton.com/proton.me) | You are permanently block, please contact customer support for more information. | F11 Transaction Blocked due to restricted email address (proton.com / Proton.me) |
| Particular customer name (sadio mane) | You are permanently block, please contact customer support for more information. | F12 Transaction Blocked due to restricted Customer |
| If gateway not found | Gateway Assigning Error, please contact with administrator. | F13 Gateway Assigning Error, please contact with administrator. |
| If customer exists (check with email/phone) and customer status is marked blocked/fraud in our system | You are permanently blocked, please contact customer support for more information. | F14 Customer Permanently blocked in our system |
| If customer exists (check with email/phone) and if transaction is not recurring type and customer has continuously 5 failed transaction within 24 hour | You are temporarily blocked. Please try again next day. | F16 Multiple failed attempts transaction has been temporarily blocked. Please contact administrator. |
| If customer not exists (check with card number) and is blocked/fraud | You are permanently blocked, please contact customer support for more information. | F17 Customer Permanently blocked in our system |
| If customer not exists (check with card number) and if transaction is not recurring type and customer has continuously 5 failed transaction within 24 hour | You are temporarily blocked. Please try again next day. | F20 Multiple failed attempts transaction has been temporarily blocked. Please contact administrator. |
| If merchant prooduct type is 'fixed' and product id available and currency is USD and product available in our system and product amount in our system not equal to given amount | Something Went Wrong! Please contact the administrator. | F21 Product type is 'fixed' and amount which is not previously mentioned is attempted |
| If merchant prooduct type is 'fixed' and product id available and currency is USD and product not available in our system | Something Went Wrong! Please contact the administrator. | F22 Product type is 'fixed' and a product which is not previously mentioned is been attempted |
| If merchant prooduct type is 'fixed' and product code available and product available in our system and product amount in our system not equal to given amount | Product not found.Please contact the administrator. | F23 Product type is 'fixed' and amount which is not previously mentioned is been attempted |
| If merchant prooduct type is 'fixed' and product code available and product not available in our system | Product not found | F24 Prooduct type is 'fixed' and a product which is not previously mentioned is been attempted |
| If merchant prooduct type is 'fixed' and product code available and product available in our system and product currency in our system not equal to given currency | Currency not supported | F25 Product type is 'fixed' and a currency which is not previously mentioned is been attempted |
| If merchant api key not available | Invalid API Key | F26 API transactions are disabled for your account. Please reach out to the administrator. |
| Card type not supported | Card type not supported | F27 The transaction is blocked due to the Restricted Card Type |
| Bin number error (xxxxxx) | Bin number error (xxxxxx) | F28 The transaction is blocked due to the Restricted Bin Number |
| Monthly transaction limit expired. | Monthly transaction limit expired. | F29 Monthly transaction limit expired.Please reach out to the administrator. |
| Daily transaction limit expired. | Daily transaction limit expired. | F30 Daily transaction limit expired.Please reach out to the administrator. |
| Amount is greater than maximum ticket size. | Amount is greater than maximum ticket size. | F31 Amount processed is Higher than maximum Ticket.Please reach out to the administrator. |
| Amount is less than minimum ticket size. | Amount is less than minimum ticket size. | F32 Amount processed is less that minumum Ticket.Please reach out to the administrator. |
| Country not supported | Country not supported | F33 Restricted Country! Not Authorized to process an order |
| Default | Transaction has been failed. Please contact with administrator for this error. | F34 Multiple failed attempts transaction has been temporarily blocked. Please try again after 10 minutes or contact administrator. |
| Gateway not supported (vip / non-vip) | Your attempt as failed. Please contact support or choose another payment method. | F35 FTD transaction, whitelisting required, contact customer support. |